Book Appointment Now

How to Read a Hygrometer Correctly
A hygrometer only helps once you know how to read it the right way, and that starts with placing it where it can measure the room, not the sunlight or a draft. You’ll want to wait for the number to settle, then check the dial or display for relative humidity. Once you know what that number means, you can spot bad readings, fix drift, and make better choices for plants, comfort, and air quality.
A hygrometer shows relative humidity, which tells how much moisture is in the air compared to saturation. Place the device away from direct sunlight and drafts for an accurate room reading. Allow the display or dial to stabilize before recording the value. Compare the reading to healthy ranges for plants and human comfort to decide needed action. Regular checks help spot drift and keep indoor air quality steady.
What a Hygrometer Measures
Usually, a hygrometer tells you how much moisture is in the air via measuring relative humidity, often shown as a percentage. You can regard it as a quick check on the air’s moisture content, not a total water count.
As the reading rises, the air holds more water vapor. Once it drops, the air feels drier. This matters because relative humidity changes with temperature, so the same room can feel different across the day.
A hygrometer can also help you notice the dew point, which is the point where air starts to give up moisture. That’s why this tool helps you understand comfort, storage, and health in one simple look. You’re not guessing, and you’re not alone in wanting air that feels just right.
How to Read a Hygrometer Dial
As you look at a hygrometer dial, begin locating the numbered scale, since those markings show the relative humidity in percent.
Then watch where the needle lands, because its position tells you how moist the air feels right now.
In case the dial has more than one scale, read the humidity side initially so you don’t mix it up with temperature.
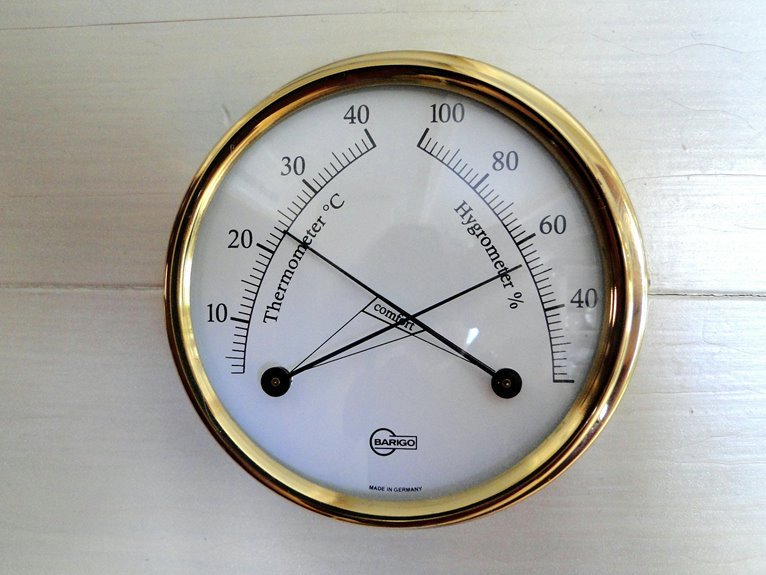
Dial Markings Explained
Because dial hygrometers can look a little confusing at initially, start with the markings on the face and let the needle do the talking. You’ll usually see scale markings in percent, often from 0 to 100, so you can place the reading in the right humidity range fast. Some dials also include calibration icons or small adjustment marks, which help you spot whether the gauge has been set correctly before use.
Should the face have color bands, they often point to dry, comfy, or damp conditions, and that makes the dial feel less like a puzzle and more like a teammate. Take a close look at the numbers, tick marks, and any labels around the edge. Once you know what each mark means, you can trust the dial with more confidence.
Needle Position Interpretation
Watch the needle closely, and you’ll see that its exact position on the dial tells you how much moisture is in the air. You don’t need to guess or strain. In case the pointer rests near 30, the room feels dry. Around 50, you’re in a comfortable middle. Near 70 or higher, the air feels damp.
For the best result, check pointer alignment at eye level and let the dial settle to begin with. Good needle calibration keeps the reading honest, so a tiny shift can matter. Should the needle sit between numbers, use the closer mark or notice the range. Then read the scale calmly, because a steady look helps you trust what you see. With practice, you’ll feel at home using the dial, and the numbers will make sense fast.
How to Read a Digital Hygrometer
At the moment you look at a digital hygrometer, start with the symbols on the screen, like RH and the percent sign.
RH tells you the air’s current humidity level, so a higher number means more moisture in the room.
Next watch for the reading to settle, because a steady number gives you a much clearer result than one that’s still changing.
Display Symbols And Units
On a digital hygrometer, the screen should make your job easy, so start looking for the humidity label, usually shown as RH or RH %. You’re part of the same comfort-checking crew when you know these display symbols. A small unit legend could sit beside the numbers and explain whether the device uses percent, degrees, or both. In the event you see display icons, like a droplet, a face, or a battery mark, they help you read the screen fast.
| Symbol | Meaning |
|---|---|
| RH | Relative humidity |
| % | Percentage unit |
| °C | Temperature in Celsius |
| °F | Temperature in Fahrenheit |
Check the label, then match it with the unit legend. That way, you won’t guess, and your reading will feel clear, steady, and easy to trust.
Interpreting Humidity Readings
Step closer to the screen and read the number that the hygrometer gives you, because that single percentage tells you how much moisture is in the air right now.
In case you see 45% RH, you’re in a comfortable zone for many rooms.
Once the number climbs, the air feels wetter; whenever it drops, it feels drier.
Trust the display after it steadies, then watch reading trends over a few days instead of judging one moment.
That helps you spot seasonal patterns, like dry winter air or muggy summer days.
Should the value seem odd, check the room first. Sun, vents, and humidifiers can nudge it off course.
With a calm setup, you’ll feel more confident and in control of your space.
What Relative Humidity Means
Relative humidity tells you how full the air is with moisture compared with what it could hold at the same temperature.
Whenever you see 50 percent RH, you’re not seeing half the air filled with water, but a moisture ratio that feels comfortable in many rooms.
As air warms, it can hold more vapor, so the same amount of water might show a lower percentage.
That’s why dew point matters too. It shows the temperature where moisture starts to settle, and it helps you connect the reading to real comfort.
You don’t need to guess. A hygrometer gives you a simple number, and you could use it to decide whether your space feels dry, balanced, or sticky.
Why Hygrometer Readings Drift
Your hygrometer can drift over time, and that’s normal enough to catch you off guard. Small changes in temperature, placement near vents or sunlight, and regular sensor wear can all nudge the reading away from the true humidity.
Should you check calibration now and then, you’ll spot those shifts sooner and trust your readings more.
Calibration Loss Over Time
Over time, even a good hygrometer can drift a little, and that can make its readings feel less certain than they used to.
You’re not doing anything wrong; long term wear, storage effects, manufacturing, and quality variance can all nudge calibration off track.
- Small shifts can add up
- Old settings might no longer match
- A trusted tool still needs checks
- You can spot drift sooner
Temperature And Placement Effects
Temperature and placement can make a hygrometer seem like it’s changing on its own, even while the air in the room hasn’t shifted much. You’re not imagining it.
Should you set the sensor placement near a window, vent, heater, or humidifier, the device can read the air around it instead of the room you care about. Direct sun can warm the case, while drafts can cool it fast. That creates thermal gradients, and your reading drifts until the sensor settles.
For a steadier result, keep the hygrometer at room height, away from walls and corners, and let it sit for a few minutes before you trust the number. In case you move it, give it time again. Small changes in location can matter, so you’re better off checking the same spot each time.
Sensor Aging And Wear
Hygrometers don’t stay perfect forever, and that can be frustrating whenever you’re trying to trust a number. You’re not doing anything wrong; the sensor is simply aging. Over time, dust, moisture, and tiny shifts in the sensing film change how it reacts, so readings can drift.
- Your sensor lifespan depends on use and storage.
- Heat and high humidity speed material degradation.
- Poor calibration can hide a slow error.
- Regular checks help you spot drift sooner.
Because of this wear, one device might start reading a few points high or low.
In case you keep it in a stable place and check it now and then, you’ll feel more confident in the result. That way, you and your hygrometer stay on the same team.
How to Calibrate a Hygrometer
A good hygrometer can still drift out of sync, so calibration helps you trust the number you see. Check your calibration frequency by examining it every few months, or sooner should the reading seem odd. Keep simple calibration documentation so you can track error and spot patterns over time. Then choose a salt trial or damp cloth trial. Seal the unit with the reference material and wait until it settles.
| Trial | Expected RH |
|---|---|
| Damp salt | 75% |
| Damp cloth | 95% |
Should your model adjust, set it to the known value. Should it not, record the offset and use that as your guide. That way, you’re not guessing alone. You’re staying in step with others who care about the same accurate air reading.
Where to Place a Hygrometer
For the best reading, place your hygrometer right in the space you want to check, not in a spot that gets extra heat, cold, or moving air. That way, you get a number that feels true to your room, not one that lies to you a little.
- Use wall mounted placement whenever the room stays fairly steady.
- Pick portable placement whenever you want to move from room to room.
- Keep it away from windows, vents, and direct sunlight.
- Set it at about eye level, then let it settle.
You’ll also want to avoid corners or shelves stuffed with decor, since those spots can trap air. Should you share the space with others, choose a place everyone can leave alone. Small moves make a big difference, and your hygrometer will thank you with a reading you can trust.
How Temperature Affects Readings
Temperature can change a hygrometer’s reading faster than you could anticipate, so the number on the screen or dial only makes sense once the room has had time to settle. You need to give the device a chance to match the air around it, because warm parts and cool parts don’t measure the same way.
With temperature compensation, the hygrometer adjusts for these shifts and gives you a truer humidity value. Still, thermal lag can slow the sensor whenever you move it from a cold hallway to a warm bedroom, or the other way around. So you should wait a few minutes before trusting the result. That small pause helps you feel more confident, and it keeps your reading tied to the space you actually share.
Common Hygrometer Mistakes
Even a good hygrometer can give you a shaky reading in case you use it the wrong way, and that’s where most mistakes creep in. You’re not alone provided your numbers seem off. Small placement errors and calibration neglect can throw off the result fast. Keep your device away from sunlight, vents, and heaters, then let it settle prior to trusting the display.
- Don’t read it too soon.
- Don’t place it near a window.
- Don’t skip a salt trial.
- Don’t treat one reading as the whole story.
Should your hygrometer be analog, check the dial carefully. Should it be digital, wait for the number to stop changing. Whenever you handle it with a little care, you get a reading you can trust, and that makes home care feel a lot less guessy.
Ideal Humidity Levels for Home Spaces
A healthy home usually feels comfortable whenever the air stays in a certain range, and that sweet spot matters more than you could envision.
You’ll usually do best around 30% to 50% relative humidity, because that range helps you breathe easier and keeps rooms from feeling too dry or too sticky. In winter, lean toward the lower end, and in summer, nudge it upward with seasonal targets that fit your climate.
Whenever you check your hygrometer, compare the reading with the room’s feel, since comfort changes by space. For pet comfort, steady air helps reduce stress and dryness for furry family members.
Suppose one room feels off, adjust slowly. Small changes often make your home feel more welcoming, calm, and lived-in.
Ideal Humidity Levels for Plants and Greenhouses
Should you’ve been watching your home’s humidity, the next step is to take into account the plants that depend on it. Your leafy friends usually do best around 40 to 60 percent RH, while tropical varieties and seedlings often want 60 to 80 percent.
In a greenhouse, you can stay close to those ranges by watching the hygrometer and adjusting gently.
- Group plants with similar needs together
- Use mist propagation for cuttings that like extra moisture
- Open greenhouse ventilation once air feels heavy
- Watch for dry tips, curled leaves, or mold
You don’t need perfect numbers every minute. You just need steady, comfortable air that helps your plants settle in.
Whenever you match humidity to their needs, you give them a place where they can truly belong.
How to Compare Indoor and Outdoor Humidity
To compare indoor and outdoor humidity, start looking at both numbers simultaneously, since the real story shows up in the gap between them. You can then notice whether your home feels drier, wetter, or close to the air outside.
For seasonal comparisons, check both readings in the morning and evening, because weather shifts can change fast. Should you see a big difference, consider sensor placement initially. Keep one hygrometer indoors away from vents and sunlight, and place the outdoor one in shade under cover.
Then compare the patterns over several days, not just one moment. That way, you join the numbers to your daily comfort, and you’ll spot whenever the air in your space starts asking for a little help.
How to Tell If Your Hygrometer Is Accurate
When you want to know whether your hygrometer is telling the truth, start with a simple salt trial and let the numbers prove themselves. Seal it with damp table salt, wait 6 to 8 hours, and look for about 75% RH. If it’s adjustable, set it there; otherwise, note the difference.
- Check battery health initially, because weak power can skew the display.
- Watch the response time, since a slow unit could still be settling.
- Keep it away from vents and sunlight during the trial.
- Compare a second reading later to see whether it stays steady.
You’ll feel better once the result matches the standard, because your setup isn’t guessing anymore. A clean reading helps you trust the whole room, and that confidence makes caring for it a lot easier.
When to Raise or Lower Humidity
Whenever your hygrometer shows humidity is too high, you could notice damp windows, a musty smell, or air that feels sticky and heavy.
Whenever it’s too low, your skin could feel dry, your throat can get scratchy, and wood or plants could start to suffer.
Through spotting these clues initially, you can adjust the air prior to the room starts feeling uncomfortable.
Signs Humidity Is Too High
High humidity can sneak up on you fast, and it often leaves a few clear clues behind. Whenever your room feels sticky, your hygrometer might show readings above 60%, and that’s your cue to pay attention.
- Windows fog up after you breathe or cook.
- Walls or pipes show beads of moisture.
- You spot musty smells, mold growth, or damp corners.
- Wood swells, paint peels, or you notice condensation damage.
These signs matter because they tell you the air is holding too much moisture, not just feeling warm.
In case you share the space with others, you all deserve a room that feels healthy and calm. So, check the reading, compare it with the room’s behavior, and reduce humidity before small clues turn into bigger repairs or unwanted cleanup later.
Signs Humidity Is Too Low
Low humidity can be just as uncomfortable as too much moisture, and you’ll usually notice it in small but stubborn ways.
Your skin could feel tight, your lips might crack, and your eyes can sting after a short time indoors. You may also wake up with a scratchy throat or notice dry air making your nose feel irritated.
Another clue is static shocks when you touch a doorknob or sweater. Should your plants droop or wood starts to shrink, the room could need more moisture too.
Once your hygrometer stays below about 30% to 40% RH, raise humidity a little. Were the air to feel harsher than usual, trust those signs and make a gentle change so your space feels more comfortable and welcoming.
Frequently Asked Questions
How Long Should I Wait Before Trusting a New Hygrometer Reading?
Wait 3 to 5 minutes before you trust a new hygrometer reading; that is the stabilization period. If you have done a calibration check, wait 6 to 8 hours for the calibration to settle, then compare again.
Can Breathing Near the Hygrometer Affect the Measurement?
Yes, your warm breath can skew the reading, like a tiny fog cloud around the sensor. Keep your face back because localized humidity rises fast and can make you believe the room is wetter than it is.
Do Analog Hygrometers Need Batteries or Power?
No, you usually do not need batteries for an analog hygrometer; it operates without power. You will still want occasional mechanical calibration so you can trust the reading and feel confident in your space.
Can I Use One Hygrometer in Multiple Rooms?
Yes, you can use one hygrometer in multiple rooms if you move it carefully. For example, you could check your bedroom then your lounge. Whether it is portable or fixed matters; using it in different rooms works best after allowing it to acclimate.
How Often Should I Check My Hygrometer for Accuracy?
You should check it monthly with a quick calibration trial and do seasonal checks too. That helps you stay confident in your readings, keep your space comfortable, and catch drift before it affects your home.